I’ve been talking with copper gravurist Barbara Sanders over Email some more about the challenges with first establishing exposure and washout times when processing a polymer plate. Also when is the right time to begin tweaking the curve applied to the transparencies. I’m hoping that documenting her journey helps provide insight to others.
~~^*~^*~^*^~*^~*~^*~^*~^*~^*^~*~^*^~*^~*^*^~*~^*~^*^~*~^~^
Barbara said:
Spent most of the day making test plates and trying to get the work flow correct. Not a bad day and feel I am close to proper exposure times. I am starting to collude that my transparency needs adjustment (the dreaded curves question!).
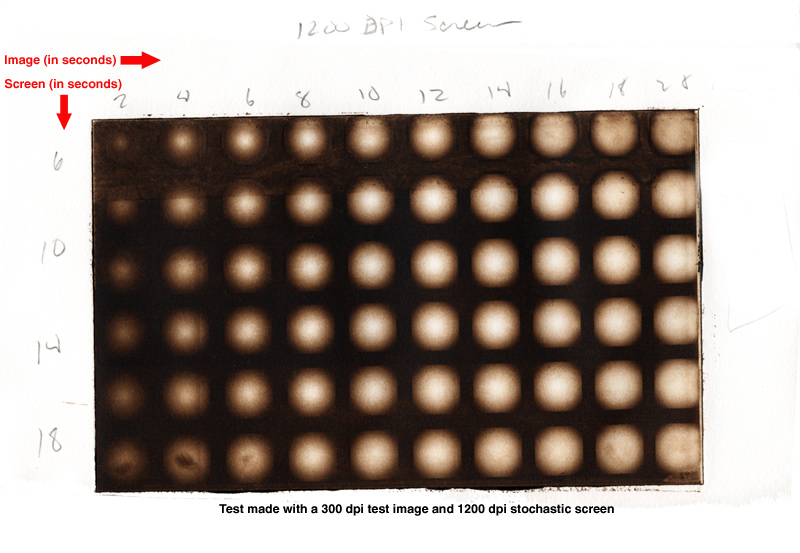
 I included the following step wedge with my test image to evaluate where things weren’t getting enough information.
0, 10, and 20% are pure white; there is no difference in black 90, 100; my 70 reads like the 80.
I am thinking if I lose density in the blacks and lower the output of the whites that they might darken (grey). Correct?…Hard to figure which variables to tweak first.
~~^*~^*~^*^~*^~*~^*~^*~^*~^*^~*~^*^~*^~*^*^~*~^*~^*^~*~^~^
Hi Barbara,
Thanks for the info. You’ve basically got 20 steps which is an ambitious undertaking flying solo, but more information is better than less. You should be able to get 20 unique tones with this process using Mark Nelson’s screen and the KM73 plates. The last 10% of perfection is always the hardest won.
My sense is if you’re losing the top 20% of your highlights 10% of the shadows (with 70 and 80 looking the same), you need to pull down your exposure times a little and get paper white at 0% and some tone in the 5% area to start with, before tackling the curve (which is how you can address at least some of the midtone/shadow detail issues later). Whether you pull back time on the aquatint screen or the film positive, or both is the question. If you lack enough exposure, the black areas of the plate will go mushy, so that will be your cue if you’ve gone too far and don’t have enough exposure time. Varying even 5 seconds of washout will also make a difference from my experience, so if you’re getting too mushy, you might back off washout time as it is the third physical variable you want to get a grip on (in addition to your two exposure times) before tweaking curves. If the plate gets too sticky and sticks to the newsprint when blotting, you may need to increase washout time (or exposures). How the plate feels is the first step to getting this first part right.
You really want to get as close as you can to even distribution of tones using exposure and washout times before fine tuning with the process compensation curve. It’s a dance between increasing and decreasing these three times until you’re safe to mess with the curve. Changing too much at once out of frustration is tempting, but don’t do it. That way lies madness. 😉
You may also find once you start tweaking the curve, you have to tweak exposure and washout times yet again. Don’t be discouraged, as this is the way you need to juggle the variables until things start coming together. It’s time consuming, but the only way I know how to go about it with any accuracy given the multitude of variables.
For my current workflow using my custom screen I use the following exposure times:
Screen Exposure Time: 10.5 units
Image Exposure Time: 14.5 units
I’m giving this as an example: This ratio of screen to image time is not critical as there doesn’t seem to be any rhyme nor reason to it with any printmakers I’ve spoken with to date. It just depends on your other variables (film density, exposure unit, screen quality). I’ve seen people have screen and image times equal or vary as much as 100%.
Another tip: Make sure you always warm up your exposure unit by blasting it for 60 seconds before exposing plates for the day. It will normalize the exposure to some degree I’ve been told.
Best of luck. Send me a scan of your printed exposure test if you’re able.
Jon