Solving Newton Rings and other Pitfalls of Polymer Photogravure

Proofing the Plate

The thrill of victory… and the agony of defeat is a quote by the late sportscaster Howard Cosell that actually defines the span of emotions printmaking offers to the casual and professional practitioner! While there are many disappointments along the path, there is nothing as elating as pulling that perfect print you’ve been working on for days.

For those of you working with DTP (or direct-to-plate, this info may still be relevant since Newton Rings typically occur between the film positive and the plate. This is because inkjet film is porous, and made to hold moisture (specifically ink). The plate surface also has moisture (as well as a light coating that rinses off in the first few seconds of plate processing).  This moisture between the film and the plate is usually the cause of this pesky mottling, sometimes referred to as “measles”. It is characterized by wiggly patterns and collections of dark spots as shown below.
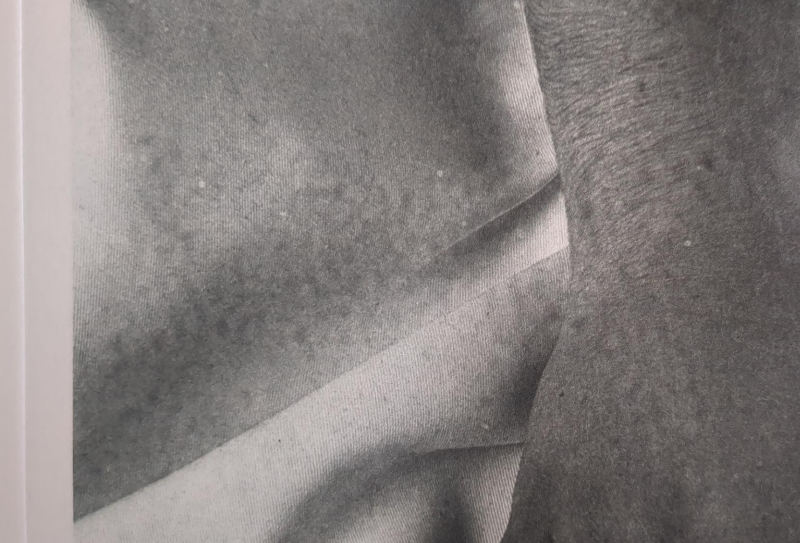
Newton ring example.

Newton ring mottling example in print
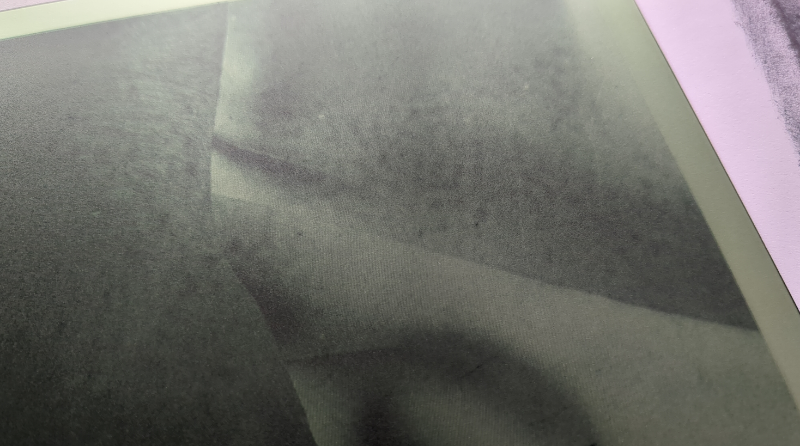
Newton ring example on plate.

Newton ring mottling example on plate.

In the exposure unit, Newton Rings are clearly visible in the example below as rainbow-iridescent patterns under the glass. These colored patterns block light from getting to the plate, causing unwanted patterns.
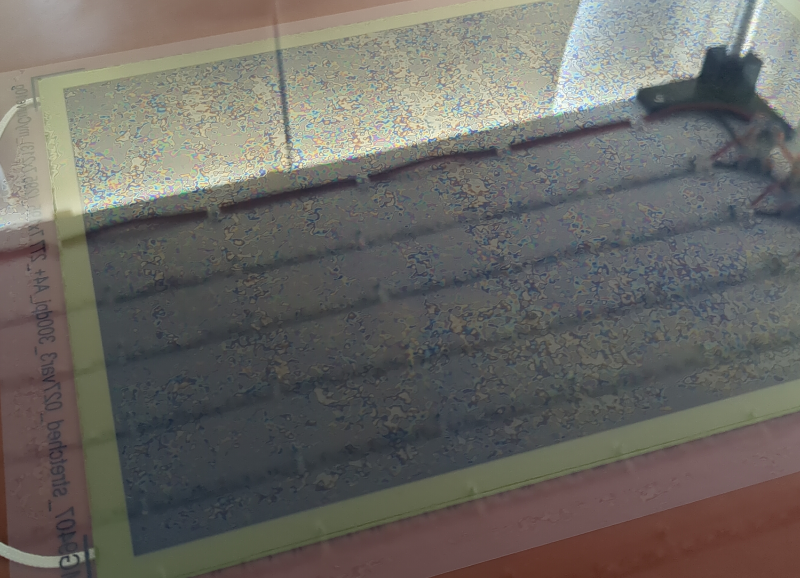
Newton rings forming prior to exposure.

Newton rings forming prior to exposure.

We do several things to prevent Newton Rings:
  1.  Dry the film positive in open air for 2-24 hours. then in a heated print drier for 10-12 minutes before exposing. A hair drier will work too.
  2.  Before aligning and exposing film positive, dust plate with baby powder lightly then brush away as much as possible,
  3. The main way we eliminated Newton Rings at Intaglio Editions was to replace the glass in our frame vacuum with Kreene plastic, as suggested to us by the kind folks at Boxcar Press, in Syracuse, NY. See the link to our full workflow at the bottom of this article.

Another common issue with platemaking is dust specks.  These look like a small, pure black, pinprick-sized dot, with a white halo around it.  This is caused by dust getting trapped between the plate and aquatint screen. We mitigate it in the shop by having air purifiers running near the exposure unit, and by wiping down the vacuum frame with anti-static cleaner before every plate made.

When troubleshooting, make sure your aquatint screen is clean too, and isn’t showing any of the same patterns, as you’re seeing in the print. I found that storing an aquatint screen on top of some unexposed plates for a period of time caused condensation to form on the screen, which showed up as mottling in subsequent plate exposures. The light residue was easily removed with film cleaner, but I wasn’t expecting that to be an issue, until it was.

Thanks to At Honig for their photo documentation.

View my full, but somewhat outdated, Polymer Photogravure Procedure here.

Working on a project with a budget means minimizing expenses. Save yourself massive headaches, months of testing, and thousands of dollars learning platemaking and order custom plates from Intaglio Editions in Colorado USA at https://shop.intaglioeditions.com  


Minimizing Dust Specks in Printmaking

For most printmakers, dust is and has historically been the bane of our existence. So much freon has never been released into the atmosphere as from all those cans of DustOff in photographers’ basement darkrooms — when darkrooms were more common. Spritzing negatives in an attempt to get that pristine, perfectly clean negative was one of the most important jobs a darkroom photographer could do.

Now that we’re in the digital age, not much has changed really. Sure, if you’re printing inkjet directly from digital you might be spared — unless there’s dust on the sensor of your camera, but even that can be whisked away in Photoshop, no problem.

For the alternative photography printmaker, however, the physical world is still a very real-world problem. If it’s not humidity causing problems on the East or West Coast United States, it’s dust, like here in Colorado. I have three air purifiers running in the studio where we make polymer photogravure plates. It helps a little, but still dust specks occur and when they do they’re likely to be in some prominent area of the composition like a sky, or the tip of someone’s nose. If it’s in the plate, it’s committed, so you take extra precautions, but what about if it’s in the ink, or dust that lands on the plate just before it is printed?

Here are some precautions to take to minimize dust specks in printmaking environments:

  1. Examine your paper for any specks before tearing and soaking it.
  2. Vacuum and wet-mop the floors and shelves.
  3. Staple plastic above your wiping area and press, if possible.
  4. Keep doors and windows closed.
  5. Keep one or more air purifiers running near your printing area at all times. Make sure they are blowing away from your materials, not at them.
  6. Make sure your rags, tarlatan, and wiping materials have been shaken out and are relatively dust-free.
  7. Examine the plate carefully while wiping to remove any chunks or specks in the ink. Use a clean, lint-free rag to brush off any remaining dust.
  8. Cover the plate with clean tissue paper immediately after examining the plate. Carry it to the press covered.
  9. Use a drafting brush to remove any particles from the printing paper that may have been introduced during soaking or blotting.
  10. Have an assistant remove the tissue carefully just before you put the paper onto the plate.
  11. Clean press bed with anti-static plexiglass cleaner between prints.

Of course, the larger the plate, the more surface area there is to get contaminated. Also the more white-areas there are, the more likely dust will appear there. The less time your plate is exposed to the open air in even a slightly dusty environment, the better chances you have of not introducing unwanted particulates to your prints.

At Intaglio Editions we strive to make photogravure-quality prints that are artifact-free, and that includes digital posterization, newton rings, dust specks and the usual list of pitfalls new printmakers tend to fall prey to. The printing process, whichever it may be, will always lend itself to the final print and influence it in some way. Intaglio printmaking is, after all, an industrial art and along with that comes large equipment, large spaces, and unfortunately, large amounts of dust which invariably, at some point, will work its way into your life, and your prints. I would assert that this very dust issue might be why most vintage photogravure prints tended to be of darker, more complex images, so the dust that does work its way into the prints is not as distracting from the image itself and it simply blends in.  People were also more accepting of it just being part of the process back then as well.