Deriving Curve and Exposure Times from Scratch

Met with seasoned copper gravure printmaker Barbara Sanders this week and had a lively exchange of information with her and her ceramicist husband Bill regarding the craft and business side of art.  Barbara is migrating from copper to polymer with great success as she works toward “close enough to perfect” to feel good about the process.  This is the quandary with most printmakers as our thirst for perfection is hard to quench.

The main geek topic of our conversation was how to best start to derive a compensation curve and exposure times.  Barbara had taken a sample of my company’s custom aquatint screen back home with her after our meeting and came back with some absolute numbers.  Here is the email exchange and some of my thoughts about starting to derive a curve, screen exposure time and image exposure time:

—–Original Message—–
From: Bill and Barbara Sanders
Sent: Wednesday, January 16, 2013 9:48 AM
To: Jon Lybrook
Subject: thanks

Such a fun afternoon!
Thank you for taking the time to see me and my work. I sure love your prints!
I measured the density of your screen  :  about 53/54 whatever units the densitometer is in
my new screen   : about 168/170
my old screen     : about 80/83
hence the different exposure times aside from our different exposure units wattage. Complicated but still fun!
Off to Mac class!
Many thanks again.
Barb

———————————-

Thanks Barbara,

Thanks for the screen measurement.  Like I said I don’t know a lot about measuring density. I guess because I pretty much worked out my process backwards from the resulting print back to the curve and exposure times.  The absolute density of a screen and film positive meant nothing to me in the beginning since I had no point of reference, unlike photogravurist John Goodman and those who have had a historical knowledge of their materials and the process.  I could only hope my screens were consistent, and so far they have seemed to be.  But I am curious about it and appreciate your encouragement in that direction.  It would help to verify consistency among my limited stock of custom screens.

Since these screens are made up of dots, as black as we can get the imagesetter to produce them, I’m assuming it’s taking an average of the dots-to-clear-film ratio and coming up with a number.  In other words, it’s not measuring a continuous-tone density as traditional film provides, but rather a combination of these factors.

I’m presuming your screens read darker because the dots are bigger, allowing less light to come through.  Not because the dots on your screens are more opaque than mine, though if your exposure time of the screen/image is too high, the density of the dots on the screen would certainly be a factor as well.

To get a good curve and exposure time relationship, I test first by getting the screen to produce the richest black in my exposure and still provide tone up the scale.  This is where
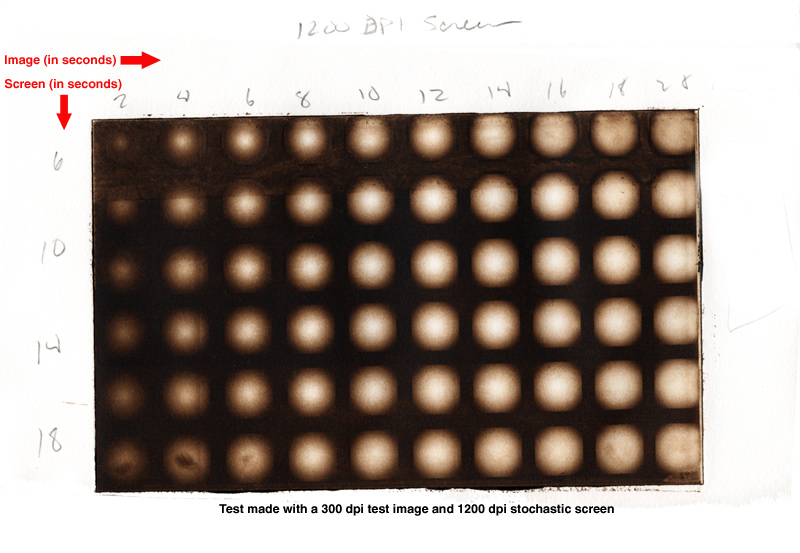
Gradient circle test Grid by Jon Lybrook

Gradient circle test Grid by Intaglio Editions

those gradient circle tests in my procedure occurred – to get a ball-park sense of where I am.  I would then tweak the curve in conjunction with exposure times until I was able to maintain a rich black and get some added continuous tone in the highlights.  Trying to keep the black where it was, I’d tweak the process compensation curve and exposure times as needed to bring out more and more of the greys in both shadows and highlights.  Kind of like chasing your own tail in a way at first, but these factors start to even out if the testing is paced and consistent.

Subtle, but possibly relevant point pertaining to the quality of the outcome and the reason why I went with an extremely fine screen:  Bigger the dots, the more contrast, the more contrast, the less possible grey tones.  I like lots of grey-tone potential because you can always add contrast in the film transparency and make it more graphic if you want to, but you can’t add broad continuous tone until you’ve been able to achieve it already through a balanced combination of the process compensation curve along with proper exposure times of the screen and film positive.

Best of luck with your curve training.  Let me know if  there are any questions I can answer in your journey!

Best regards,

Jon

.

Imagesetters, Aquatint Screens, and What Killed the Last Dinosaur

Imagesetters were the Tyrannosaurus Rex of graphic arts service bureaus in the 1980s. They did everything bigger, better, faster and cheaper, and took the commercial printing world by storm. They were the first wholly digital commercial output devices which used lasers to create high resolution films for the industry. They are basically giant, black and white film processors that use photo-based film and photo chemistry and are therefore, like the dinosaur Kodak, fast becoming all but totally extinct.

So why are imagesetters relevant to today’s fine art printmakers? Why is it a problem they are going away? In one sense it is not. Most printmakers are artists in their own right, and as such are scrappy, persistent, creative, industrious, loners. We figure out how to get things done, regardless of the technical difficulties and limitations. Were there to be no more aquatint screens or intaglio presses available tomorrow, you could leave it to a printmaker to find a way to work, invent a solution, plod on, and keep the tradition alive. When you’re the only one in the studio who is aware of the difficulties you face, and cares, it’s lonely, but the energy of overcoming the challenges is exhilarating and keeps us going forward.

The advent and subsequent maturity of inkjet technology has put most imagesetters out to pasture long ago (and sent quite a few south to Mexico as well). Yet, nothing has quite come along to completely replace their capabilities. While inkjet printers are perfect for creating prints, digital negatives and film positives, the dot created by inkjet technology is not at all comparable to what the behemoth imagesetters can do. Inkjet output, while lush and pristine at arms length, are smeared and fuzzy when you look at it under a loupe. When transferred to polymer plate, these fuzzy divots turn the photopolymer mushy, versus the hard, solid points required to create a good, durable plate matrix that will withstand the pressure and repetition of a professional intaglio printing press run. The commercial printmaking industry has found other, “direct to plate” methods that has made film, and thus imagesetters, obsolete. However direct to plate is very expensive and so there is still a vital need for such technology to produce aquatint screens within the fine art printmaking community.

Intaglio Editions Aquatint Screen

Holy Grail of Polymer Photogravure: The Intaglio Editions Aquatint Screen

Aquatint screens are high resolution dot screens, used to produce a random pattern of precise dots on polymer plates. Aquatint screens are analogous to the rosin dust used in the step of “dusting” plates, with copper plate photogravure to create a similar, high resolution, random dot pattern. They are often used in polymer platemaking using the ‘double exposure’ method popularized by modern printmaking pioneer, teacher, and author Dan Welden. Using this method, first the plate is exposed to the aquatint screen, then to the image positive. The dot screen allows ink to get distributed evenly throughout the plate, then the film positive image creates the bias and distribution of light or dark, depending on the image. Dan is a marvelous instructor and legendary in the art of printmaking by the way, and if you have the opportunity to hear him speak or take a class with him, do not miss it.

So, one of the keys to creating rich, uniform, continuous tone intaglio prints is to have a well-made aquatint screen. At Intaglio Editions we invested in customizing the highest resolution aquatint film we could get for our process to create some of the most continuous tone, photogravure-quality intaglio prints from polymer plate. Nothing we have found commercially is as fine, nor as smooth. Unfortunately, we were never in a position to produce or sell our custom aquatint film commercially. It wasn’t what we were interested in doing and the vendor who produced them for us has since proven disinterested or incapable of living up to the standards we need.

Luckily there are still a few imagesetters being maintained and kept in production, and there are still a number of fine art printmaking supply companies offering either generic or trademarked aquatint screens they will sell you. If you find a screen you like, buy alot of them quickly. Rumor has it the industrial-grade, infrared film used in this process will soon stop being manufactured. When this happens, what will become of the polymer photogravure process is unclear. We could all settle for more graphic-arts looking prints, print using other alternative processes such as platinum and palladium, or go back to creating copper gravure plates using rosin dust!

My sense is it will go back to the way things were done during the time of Albrecht Durer, the founder of printmaking, where artists would go to the technicians and, working with them directly, would have their images engraved professionally by the artisans who know how to do it best. Much like a conductor might guide an orchestra to the proper nuances and toward the desired finale. This approach is not for all printmakers where the do-it-yourself spirit is high. But it can be much more cost effective than re-inventing the wheel. Dan Welden once asked me, do you want to be the artist wearing the beret on his head, or the guy with plunger in his hand? At the time I wasn’t sure, but my answer today is, both. As collaborators we can do so much more, so much better, and do it more consistently than we ever could on our own.

So what killed the very last T-Rex? My guess would be loneliness.